
How to Plan for Shed Demolition and Cleanup
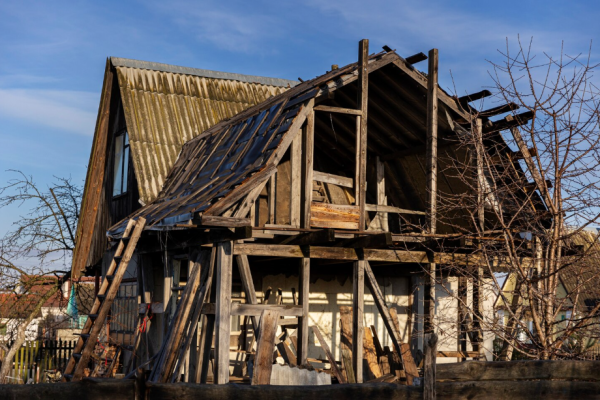
Planning a shed demolition requires strategy, safety, and responsible cleanup. Start by assessing the structure and obtaining any necessary permits.
Denver, CO, United States, 1st Oct 2025 – Planning a shed demolition goes beyond just tearing down walls—it’s about strategy, safety, and sustainability. Start by assessing the shed’s structure and materials, as these will determine the tools and methods needed. Check local regulations to see if a demolition permit is required. Once you have a plan in place, disconnect utilities like electricity, water, or gas to ensure safety. Next, clear the shed of all contents, sorting through items to donate, recycle, or dispose of unwanted belongings. Gather the necessary tools such as a sledgehammer, crowbar, and safety gear, including gloves, goggles, and boots. Begin the demolition methodically, starting with non-structural elements, followed by the roof, walls, and finally the flooring and foundation. During cleanup, separate recyclable materials from trash and dispose of everything responsibly. A clean, prepared site ensures a smooth demolition process and leaves your yard ready for the next step.

Assess the Shed and Obtain Necessary Permits
Before beginning the demolition, you need to assess the shed’s structure and materials. Start by checking whether the shed is built from wood, metal, or a combination of these. This initial assessment is vital as the materials will influence your demolition approach, including the tools needed and how to safely handle debris. If you’re unsure about the materials, especially if the shed contains asbestos or lead paint, take necessary precautions or consult a professional for guidance.
Additionally, it’s essential to check local building codes and zoning laws to determine whether a demolition permit is required. In many areas, you’ll need a permit for demolishing structures, even small ones like sheds. Taking the time to obtain the proper permits ensures you’re compliant with the law and avoids potential fines or legal issues. By planning ahead, you can ensure that your demolition is legal, safe, and free from unnecessary complications.
Disconnect Utilities and Remove Hazardous Materials
Safety should be a top priority when preparing for shed demolition. If the shed is connected to utilities like electricity, water, or gas, it’s crucial to disconnect these services before proceeding. Electrical connections should be handled by a licensed electrician, and plumbing or gas lines should be disconnected by professionals to prevent any dangerous leaks or accidents. Additionally, inspect the shed for hazardous materials that could pose risks to your health or the environment.
Materials like asbestos, lead paint, or old chemical containers may be present in older sheds. If any hazardous substances are identified, hire certified specialists who can safely remove and dispose of these materials according to environmental and safety regulations. Never attempt to handle these hazardous materials on your own, as improper disposal can lead to serious health risks and legal penalties. Ensuring that utilities are disconnected and hazardous materials are removed before demolition begins is essential for a safe and responsible project.
Clear the Shed’s Contents
Before you take a single swing at the walls, it’s vital to empty out the contents of the shed. This is a straightforward step, but one that can be easily overlooked. Take inventory of everything inside the shed—tools, garden equipment, old furniture, and any other items you might have stored there. Consider donating items in good condition or recycling items that can be repurposed. If you come across things that are broken, outdated, or no longer of use, set them aside for disposal.
Clearing out the shed not only gives you a clear working space for the demolition but also helps you take stock of items that need to be dealt with separately. Sorting the shed’s contents before starting will save time and allow you to focus on the demolition itself. Remember that some items may contain harmful substances, like old paint or chemicals, so make sure to dispose of them properly. Clearing the space efficiently is an essential first step in a successful shed demolition project.
Gather Necessary Tools and Safety Equipment
Before you start tearing down the structure, it’s important to gather all the necessary tools and safety equipment for the job. The right tools will make your demolition job faster and safer. For most sheds, essential tools include a sledgehammer, pry bar, reciprocating saw, and screwdrivers to remove nails and screws. If the shed is made of metal, you may also need a cutting tool, like a grinder or a metal saw, to cut through the panels. In addition to tools, safety gear is just as important.
Wear heavy-duty gloves to protect your hands from sharp edges and debris. Safety goggles will shield your eyes from flying particles, while a hard hat can protect your head from falling debris. Steel-toed boots are recommended for foot protection, especially when dealing with heavy or sharp materials. Wearing the right protective gear ensures that you minimize your risk of injury while working, making the entire demolition process safer and more efficient.
Dismantle the Shed Methodically
When you begin the demolition process, it’s essential to dismantle the shed methodically. Start by removing any non-structural elements such as doors, windows, and shelving. These parts can be easily detached and set aside for later disposal or repurposing. Next, tackle the roof—it’s usually best to start from the top and work your way down. If the roof is made of shingles or other materials, remove them first to lighten the structure.
Once the roof is cleared, move on to the walls. For wooden sheds, a pry bar is helpful in loosening nails and pulling apart the panels. If the shed is made of metal, use a wrench or drill to unscrew the fasteners or a saw to cut through panels. Working from top to bottom ensures that the shed remains structurally stable while you’re dismantling it. This methodical approach also helps avoid unnecessary damage to the surrounding area and provides better control during the process.
Remove the Flooring and Foundation
After the walls and roof are removed, it’s time to turn your attention to the flooring and foundation. Depending on the type of flooring, the method of removal can vary. If the shed is built on a wooden floor, you can typically use a crowbar or pry bar to remove the boards, starting from the edges. If the flooring is made from concrete, however, it’s likely to be much more difficult to remove. In this case, you’ll need to use a sledgehammer or even a jackhammer to break the concrete into manageable pieces.
If the shed was anchored to a foundation, it’s important to remove all fasteners and nails holding it down before lifting or dismantling it. Once the floor is removed, the site will be left with a clean, level surface, which is ideal for any new construction or landscaping you may have planned. Removing the foundation is critical for ensuring that the area is properly prepared for its next purpose.
Sort and Dispose of Debris Responsibly
With the shed now completely dismantled, it’s time to focus on responsible disposal. As you collect the debris, sort it into categories: recyclable, reusable, and trash. Metal panels and components can typically be recycled, as can certain plastics. If your shed contains items like old wood or doors, you may be able to reuse them for other projects. Any remaining trash should be carefully disposed of according to local waste management regulations. Renting a dumpster is a good option for large amounts of debris, but ensure it’s filled properly to avoid overfilling and potential fines.
If you can’t handle the disposal process yourself, consider hiring a junk removal service. Many services specialize in eco-friendly disposal, ensuring that recyclable materials are properly handled and that your shed demolition remains sustainable. Sorting and disposing of materials responsibly not only helps the environment but also keeps your space clean and organized during the demolition process.
Final Site Cleanup and Inspection
Once all materials have been removed, it’s time for the final cleanup and inspection. Start by thoroughly sweeping the site to remove any nails, screws, or small debris that may pose hazards. Check the area for any large pieces of wood or metal that may have been missed. If the site is still rough or uneven, you may want to use a shovel or rake to smooth out the ground and ensure proper drainage. If you’re preparing the area for a new structure, this step is essential to create a solid foundation. Once the area is clean and clear, take a moment to inspect the entire site for any remaining hazards. Look for exposed nails, screws, or sharp objects that could cause injury. This inspection ensures that your demolition site is safe and ready for its next phase, whether that’s construction or simply clearing space for a new project.
Here’s a quick look at the neighborhoods we serve, making it simple for residents to get prompt junk removal services right in their area:
- Capitol Hill – Known for its historic charm, apartments, and condos, residents often need help clearing out old furniture and apartment junk.
- Five Points – This vibrant area benefits from timely junk removal for both residential and small commercial properties.
- Cherry Creek – Home to luxury living and high-end retail, junk removal here often includes furniture, electronics, and yard debris.
- Highlands – Residents enjoy modern and historic homes; junk removal services help maintain the aesthetic of these beautiful neighborhoods.
- Washington Park – With beautiful homes and gardens, yard waste removal and seasonal cleanouts are popular requests.
- LoDo (Lower Downtown) – Apartments, lofts, and commercial spaces all need fast, reliable junk removal near me.
- Stapleton – Family-oriented neighborhood where cleanouts and junk hauling for renovations are in demand.
- Auraria – Student housing and small apartments often require junk removal for furniture, appliances, and clutter.
- Sloan’s Lake – With lake views and older homes, residents often seek junk removal for both indoor and outdoor spaces.
- Park Hill – Full-service junk removal helps maintain these classic homes, from attic cleanouts to large furniture removal.
Conclusion
Planning and executing a shed demolition project involves careful thought and preparation. It requires the right tools, a commitment to safety, and a focus on environmentally responsible disposal. By following the steps outlined, you can ensure a smooth and efficient process that clears space and provides a clean slate for new possibilities. Whether you’re looking to make room for a new structure, garden space, or simply reclaim your yard, proper planning and execution are key to success.
If you’re located in the Denver area and prefer to have experts handle the job, Green Earth Junk Removal offers professional shed demolition and cleanup services. With their eco-friendly approach, they ensure that materials are disposed of properly, recycled when possible, and that your property is left spotless. Their team is dedicated to making your demolition project as seamless as possible, leaving you with more time and energy to focus on your next project. For more details or to request a free estimate, visit greenearthjunk.com or call 720-517-7649.
Green Earth Junk Removal
1833 N Williams St, Denver, CO 80218, United States
+17205177649
Company Details
Organization: Green Earth Junk Removal
Contact Person: Green Earth Junk Removal
Website: https://greenearthjunk.com/
Email: Send Email
Contact Number: +17205177649
Address: 1833 N Williams St, Denver, CO 80218, United States
City: Denver
State: CO
Country: United States
Release Id: 01102534752